
Introduction
I recently wrote an article on how to optimize an Apache HTTP server in order to get better performance. This article is on how to optimize an Apache Tomcat server by enabling gzip and Expires headers.
Determine Current Config
It’s important to do a before and after analysis, in order to determine that your changes have taken effect, and that the performance changes do indeed make a positive performance improvement. To check your web page before optimization, open a browser enter your web page URL and then press the CTRL+F5 keys at the same time to force the browser to not use locally cached files. Some web pages that are dynamic (for example using AJAX) may still cache files, and the verification on those types may not be valid.
I normally use a FireFox browser for all my development work, since it’s one of the best browsers for doing software development. To open the Network tab in developer tools, press CTRL+SHIFT+Q, then enter a CTRL+F5 to refresh your page again. It will look like the sample screenshot below:
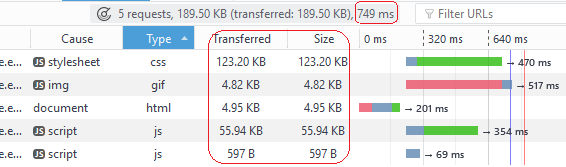
Notice I’ve highlighted the Transferred and Size columns to show that they are exactly identical, which showing that there is no compression whatsoever. I also highlight the total response time of “749 ms” (total time taken to get a complete response) for reference later in this article.
To check browser caching, this time in your browser URL field, click the end of the URL and press ENTER. This does not force a refresh and if the browser is capable it will try to cache files, but this does not mean Expires headers are set (and working). For my web application, below is the example screenshot I got:

So if you look at the Transferred column, notice it shows “cached”. This means that the browser has tried to grab the cached version of the file. It does not mean the Expires headers are set. When I click on the “html” file in the list, it will show the headers sent and received; below is the screenshot of that:

Notice that there are no Expires headers in the Response headers. So the browser has cached the file, which is good, but the browser may still request the file in the future based on the need to get the file.
Configuring gzip on Tomcat
To enable gzip compression on Tomcat, browse to your $CATALINA_HOME/conf directory ($CATALINA_HOME is the directory where you’ve installed Tomcat) and open the server.xml file. In the Service collection, edit the Connector that you want to enable gzip compression on and edit as per the following example:
<Connector
	port="8080"
	protocol="HTTP/1.1"
	connectionTimeout="20000"
	redirectPort="8443"
	compression="on"
	compressableMimeType=
	"text/html,text/xml,text/plain,text/css,text/javascript,application/javascript"
/>
Note in the above example the attributes compression and compressableMimeType have been added. The compressableMimeType can be set to any standard mime type that you want to enable gzip compression on; however it would not make sense to use any image mime types, since images are normally compressed and it doesn’t make sense to double compress.
After making the above compression changes to your server.xml file, you’ll need to restart your Tomcat server and wait for your war files to be deployed (as applicable) and your web services are ready. Then open a FireFox browser and enter your web application URL in the URL field and enter CTRL+F5. Below is an example of what I saw after this was done:

Notice the Transferred size is much smaller than the Size column. This shows that gzip is working. You’ll also notice the Javascript file of 597 Bytes and gif file of 4.82 KiloBytes are not being compressed. The image is not compressed because we didn’t choose to double compress images; but the Javascript file is not compressed because of the original file size itself. This is because there is a compressionMinSize default value of 2048 Bytes. If you need to compress files smaller than 2048 Bytes, you need to set the compressionMinSize attribute, and set it to the minimum value you need.
Configuring Expires Headers on Tomcat
To enable the Expires headers on Tomcat, you’ll need to edit the $CATALINA_HOME/conf/web.xml file as per the following example:
<filter>
	<filter-name>ExpiresFilter</filter-name>
	<filter-class>org.apache.catalina.filters.ExpiresFilter</filter-class>
	<init-param>
		<param-name>ExpiresByType image</param-name>
		<param-value>access plus 2 weeks</param-value>
	</init-param>
	<init-param>
		<param-name>ExpiresByType text/css</param-name>
		<param-value>access plus 2 weeks</param-value>
	</init-param>
	<init-param>
		<param-name>ExpiresByType text/html</param-name>
		<param-value>access plus 2 weeks</param-value>
	</init-param>
	<init-param>
		<param-name>ExpiresByType application/javascript</param-name>
		<param-value>access plus 2 weeks</param-value>
	</init-param>
	<init-param>
		<param-name>ExpiresByType text/javascript</param-name>
		<param-value>access plus 2 weeks</param-value>
	</init-param>
</filter>

<filter-mapping>
	<filter-name>ExpiresFilter</filter-name>
	<url-pattern>/*</url-pattern>
	<dispatcher>REQUEST</dispatcher>
</filter-mapping>
Just add the code before the closing web-app tag in the web.xml file and save it. The above code will set the Expires headers to 2 weeks for each of the various mime types specified. After making the above changes and saving the file, you need to restart Tomcat and wait for the services to start. Then open your browser first do a hard refresh then do a soft refresh. The results will show cached files, then if you click on the html file, the headers looks like the following screenshot:

You’ll notice in the Response headers there is now an Expires header and the value is 2 weeks (as per the configuration). The 2 weeks is calculated from the Date header of 10 Aug and the Expires header of 24 Aug, which is 14 days difference or 2 weeks total. This positively confirms that Expires is working correctly.
Notice I also have circled the total response time of “123 ms“, which is significantly much less than the original total response time of “749 ms“; which is a good reason to use gzip and Expires headers.
PageSpeed Insights Results
Also after all my changes, I went to Google’s PageSpeed Tools Insights and ran a test to see the results after enabling gzip an Expires headers, and got a 91/100 for Mobile and 97/100 for Desktop. This was a significant improvement from the previous config, and is a good reason to perform these optimizations on your Tomcat server.

Hope this will help you out!

You really make it appear so easy with your presentation however I to find this topic to be really something that I believe I might by no means understand. It sort of feels too complicated and extremely vast for me. I am looking ahead to your next put up, I’ll try to get the dangle of it!
I’m no longer positive the place you are getting your info, but great topic. I must spend a while learning more or figuring out more. Thanks for excellent information I was on the lookout for this information for my mission.
I do consider all of the concepts you’ve offered to your post. They’re really convincing and will certainly work. Nonetheless, the posts are very brief for novices. May you please lengthen them a bit from next time? Thanks for the post.
Hi Alvin
Nice article. We have been trying to do this for our site but it is not working for us even after we have done all changes suggested by you. Is there anything else needs to be done? BTW, gzip is working but browser caching is not working. Thanks.
Mahesh – can you elaborate more? My article is fairly detailed with the steps to follow. Are you using FireFox and do you see “cached” in the “Transferred” column? Also did you maybe use F5 instead of just clicking the refresh button on the browser toolbar?
Dear Alvin
Thanks for reply. Yes your article is very detailed and we have configured it same way. But all js, css and images are getting downloaded again from server and not from cached. We have checked with both Chrome and Firefox with both soft and hard refresh. The ‘Transferred’ column shows file size instead of ‘Cached’. And ‘Disable Cache’ option is also not selected in ‘Inspect Element’. We have Apache Tomcat server where we have configured both web.xml in /root/pms/apache-tomcat-9.0.1/conf as well as /root/pms/apache-tomcat-9.0.1/webapps/ROOT/WEB-INF folder. Is there any issue with Tomcat?
Mahesh, are you able to post your “$CATALINA_HOME/conf/web.xml” file somewhere so I can take a look? I suspect a “configuration” issue for sure! Also, Tomcat has logging capability; so you might want to turn on either INFO or DEBUG logging and then restart and check your logs to see if you can figure out where the config error is incorrect.
Dear Alvin
Please find attached related information.
Doesn’t look like it got attached Mahesh. Was it a link or an attachment. Not sure if WordPress supports attachments.
Yes, it was attached thru email. However, please look it at here https://drive.google.com/drive/folders/1_wo6O-9K2d46LzyG7DX9l6vu2eJZGGDQ?usp=sharing
Where’s your server.xml file? That contains the “” tag configuration that I need to see! Also I see some SEVERE errors in your log – you will need to deal with that too. One of them is a “etagFilter” configuration issue. The other one appears to be a protocol issue. You should probably deal with those. I noticed in your screenshot you are using a non -standard port of “8090”. That probably needs to match for the “port”, where in my sample config I use “8080”.
I have put in server.xml also there. Yes, we were also trying to configure eTag Filter, bu I think it is not configured properly. About protocol issue, we will look into it and solve. Thanks.
Hi – a quick search for “compressableMimeType” on the Apache Tomcat 9 docs page shows that instead it should be “compressibleMimeType”. Here is the Docs site: https://tomcat.apache.org/tomcat-9.0-doc/config/http.html
By the way, you probably could have figure this out on your own, had you just looked at and interpreted logs.
So end result is you need to use “compressibleMimeType” instead. I’m almost 100% certain that will fix the issue.
Did you see my last response? Did that work?
We have resolved the etag and compressiblemimetype issues. But still browser caching is not working. Cache-control shows no-cache still in response header. I think there must be something from spring mvc controller. We will look into that also. Thanks for your time and support.